Are you running HomeLab services on your network? Are these services safely closed off from the internet? While this is a safe move, accessing your self-hosted content while you’re away, is likely not possible. Traveling and want to access your homelab resources, perhaps? Well today’s solution should help set you right up.
Quick Disclaimer: Even if you do not have a Raspberry Pi, this tutorial can still be useful. It is intended for any Debian-based OS, virtual or not.

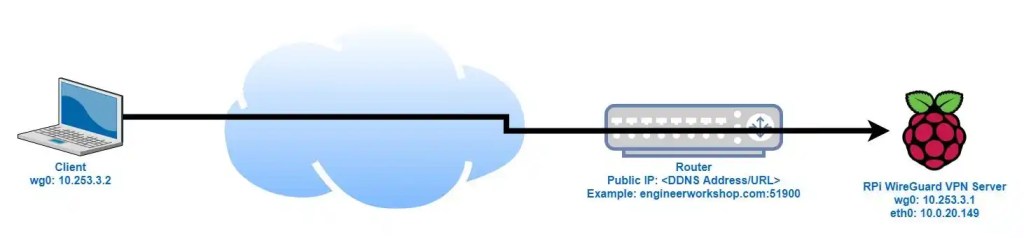
Keeping in mind that a VPN logically connects two networks via an encrypted tunnel, this allows a remote machine to communicate with nodes on a faraway network. The remote machine can access all available resources as if it was physically on the network
Now while most advertisements for commercial VPNs will try to sell you on cloaking your traffic, the main point of this tool will be tunneling back home and using your own network. There is no hiding your traffic from your ISP with this one, simply tunneling back home and using your home network from anywhere in the world.
Since this free VPN isn’t intended to obfuscate traffic from your ISP, I recommend keeping a commercial VPN, such as Mullvad, and using this other VPN solution when needing homelab services from afar.
The solution I implemented for remotely accessing my home network is called PiVPN. It is a quick and easy tool to setup. PiVPN uses Wireguard as its backbone. Wireguard is a fairly newer VPN protocol and is the hot, new protocol on the block. It’s faster at making connections than OpenVPN and uses significantly less code which in turn reduces attack surface.

The guide I followed to set this tool up can be found here. Don’t let the name throw you off, this tool works flawlessly on x86 architecture as well. The setup process can be replicated on any Debian-based OS and For my implementation I ran it on Ubuntu Server 22.04 running in Proxmox.
The guide is thorough and helps quite a bit, but the setup wizard really does a great amount of leg work as well. As long as your system is up -to-date, ensure ‘curl’ is installed then you can begin.
- To install curl run: sudo apt install curl -y
After curl is installed run the following command:
- curl -L https://install.pivpn.io | bash
This will install the tool and begin the setup wizard. Refer back to the PimyLifeUp guide as the setup should be identical.
Important Notes:
- The Setup wizard will default to Port 51820 for the VPN connection. You can either leave this or change it to another Random High Port. Good security would be to change this since it is well known that Wireguard uses this port, and anyone that scans your network could determine that this is a port being used by a VPN.
- You need to enable port-forwarding in your firewall rules for this VPN to work. If you don’t forward traffic from the server running PiVPN, you will not be able to use the VPN. After determining your RHP, ensure that traffic from the server in question is forwarded to the router, and there is a port-forwarding rule in place. It would also be a smart move to set up Static IP addressing so that the Server doesn’t get assigned a different IP address if it needs to reboot.
- Static routing and Port-forwarding will vary based on the Router.
Looking to set up a Wireguard Client on your phone?
- There is an Android Application!
- There is also an IOS Application
Setting this up on my mobile devices is a snap with the QR code scanning to add configs. I also like the hot-button that the Android App allows me to put in the quick-access dropdown menu.
I really enjoy this tool and the application integration. I love Wireguard and the PiVPN project. I hope you get as much use out of these tools as I have. Take care and keep on learning.

One response to “Remote Access with PiVPN”
[…] access (Unless you’ve set up a VPN connection to your own Homelab, as detailed in my previous blog post.) With that lack of Homelab access, I am restricted to the movies, music and media I have prepared […]
LikeLike