Do you have smart light bulbs in your home? Maybe some smart plugs controlling lamps or other appliances? How about a smart thermometer? If you said yes to any of those devices, I can almost bet that each one has their own app to control said device. What’s more, is that I can bet that each device is sending your precious data back to the mother ship [insert big corporation here] to be sold off without your known consent. (I say ‘known’ because it was probably buried in the terms and services, but who really reads that?) To recap, we have a house full of smart devices that reach out of your network with telemetry, and the only way to control them is through several apps that require Internet connection and they all have separate credentials. You must be thinking, there has got to be a better way to manage it all.
Enter, Home Assistant. With its first release being all the way back in September of 2013, Home Assistant was founded by Paulus Schoutsen. This open-source software was intended to simplify the ‘Smart Home’ tangle of issues that were addressed earlier. Providing a central management interface, you can add device controls and stats to a single user interface by adding what Home Assistant refers to as ‘integrations’. Each one of these integrations should allow the device running Home Assistant, to be able to control the smart device and keep all the data and control local. This focus on local control and increased privacy is more or less a tenant of open-source and has been a strong focus of the Home Assistant project since it launched close to a decade ago.
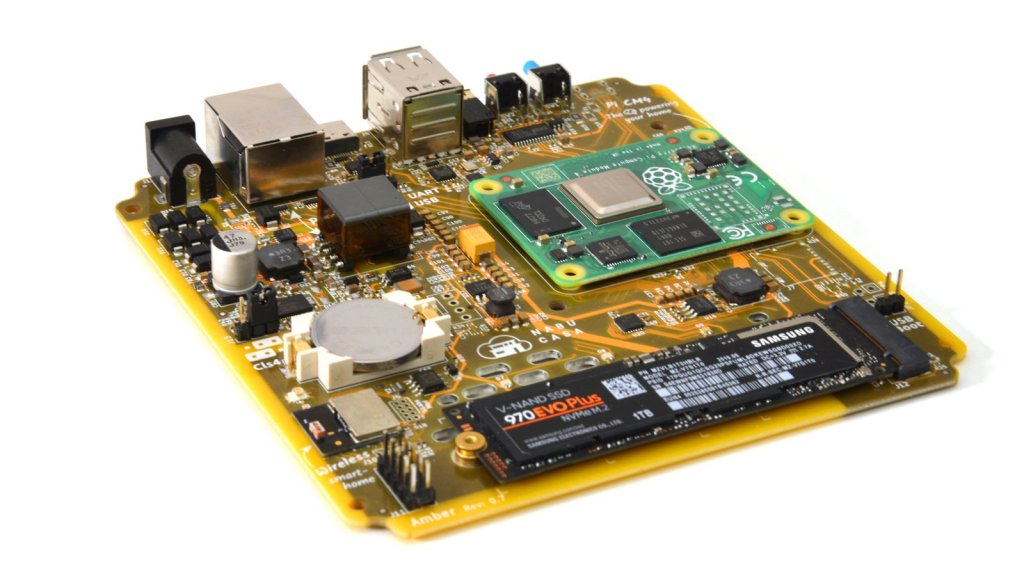
The original allure of Home Assistant for me, was that it was free and easily deployable on any device. From a Raspberry Pi to an Intel NUC, Home Assistant could be run on just about any device. That being said, I had originally deployed it in a Docker container on an older mini PC, and it worked, but I didn’t use it all that much. Fast forward about a year, and I caught wind of the Home Assistant Yellow Project. The Home Assistant Yellow, formerly known as the Home Assistant Amber, is a kit that integrates a Raspberry Pi Compute Module 4 and includes a beautifully busy I/O board and a frosted plastic case. This I/O board has a place for the CM4 to be mounted, adding functionality for Ethernet (PoE in the pricier models), a m.2 expansion slot, a built-in Zigbee module (used for smart devices running the Zigbee protocol), and a few other bells and whistles.
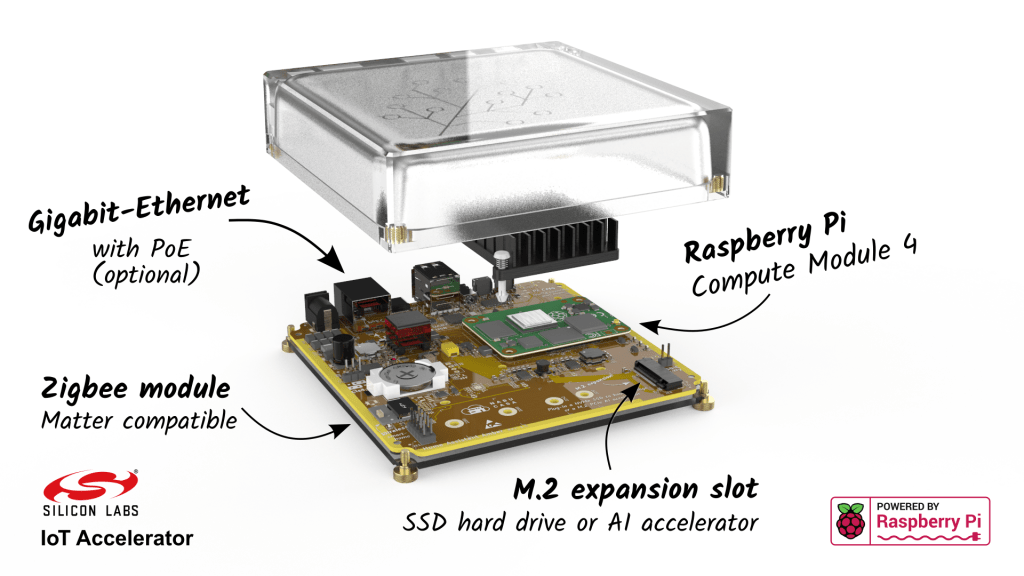
Now I know some people might say, “Who cares? Its just another I/O board for the CM4!” Well the difference lies with the added Zigbee hardware and the lovely preinstalled Home Assistant Core Operating System. Also the darn thing has a sweet case, alright. So its definitely better than just another I/O Board. The proof is in the pudding with this device, as it is as Plug-n-play as any smart device comes. I pre-ordered mine through the Crowd Supply Campaign and got it in the mail in October of 2022. It came with a small info card that told me to plug it in and go to a URL and I was off to the races. I haven’t looked back since.
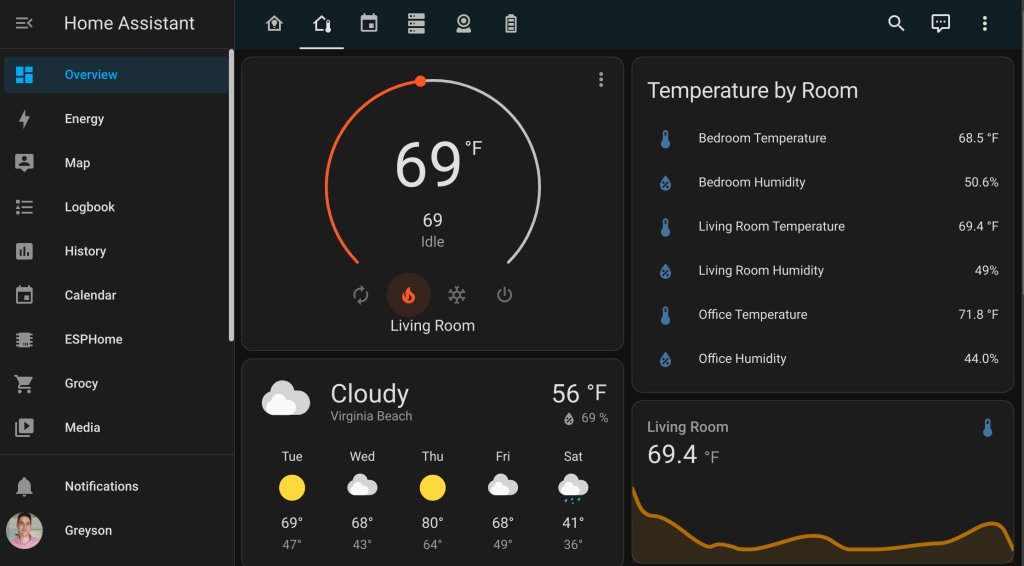
To say Home Assistant only provides a few toggle buttons for some smart lights and smart plugs would be massively underselling the product and would be an egregious crime. In my short time of diving back into Home Assistant, I have been absolutely blown away by all of the functionality this tool can do. Smart plugs aside, you can create dashboards to monitor sensors in your devices to check on battery health and statistics, import camera feeds to remotely check on your home, integrate humidity and temperature sensors to see trends, configure server monitoring tools, even use Home Assistant as your dedicated Wireguard VPN Server.
This post was more of a review on my wonderful experience with the Home Assistant Yellow than anything else, but if you are interested in deploying Home Assistant on your own hardware, it is as easy as running a command. For this specific deployment, having Docker installed is a pre-requisite. Refer to my post on Docker Desktop if you aren’t sure about using Linux but would still like to run Docker.
NOTE: Before running any commands, modify the below fields to fit your directories and variables.
To install Home Assistant via a Docker Container, run the following command:
sudo docker run -d \
  --name=homeassistant \
  --net=host \
  -e PUID=1000 \
  -e PGID=1000 \
  -e TZ=America/New_York \
  -p 8123:8123 `#optional` \
  -v ./config:/config \
    --restart unless-stopped \
  lscr.io/linuxserver/homeassistant:latest
- For the TZ Variable, replace it with your current Time Zone. Refer to the Time Zones listed here.
- For the /path/to/data filepath, use whatever filepath you feel confident storing your config files for your docker container. If you are unsure, you can leave it and it should place it in your home directory.
Below is the Docker compose format if you prefer that route.
version: '3.3'
services:
linuxserver:
image: lscr.io/linuxserver/homeassistant:latest
container_name: homeassistant
network_mode: host
environment:
- PUID=1000
- PGID=1000
- TZ=America/New_York
ports:
- 8123:8123
volumes:
- ./config:/config
restart: unless-stopped
If you are absolutely enamored with Home Assistant after deploying it on your own hardware, consider purchasing a Home Assistant Yellow kit to support the Team over at Nabu Casa.
As always, always challenge yourself to keep learning.
